Setting the controls of Oscilloscope
After plugging in the oscilloscope, take a look at the front panel. It is divided into three main sections labeled Vertical, Horizontal, and Trigger. Your oscilloscope may have other sections, depending on the model and type (analog or digital).
Notice the input connectors on your oscilloscope. This is where you attach probes. Most oscilloscopes have at least two input channels and each channel can display a waveform on the screen. Multiple channels are handy for comparing waveforms.
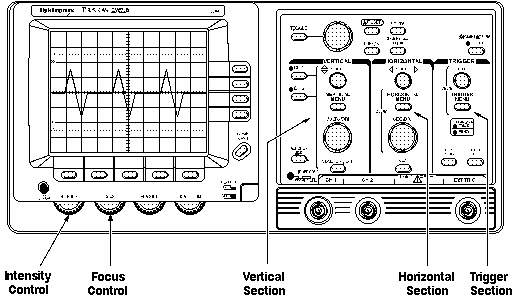
Front Panel Control Sections of an Oscilloscope
Some oscilloscopes have an AUTOSET or PRESET button that sets up the controls in one step to accommodate a signal. If your oscilloscope does not have this feature, it is helpful to set the controls to standard positions before taking measurements.
Standard positions include the following:
- Set the oscilloscope to display channel 1
- Set the volts/division scale to a mid-range position
- Turn off the variable volts/division
- Turn off all magnification settings
- Set the channel 1 input coupling to DC
- Set the trigger mode to auto
- Set the trigger source to channel 1
- Turn trigger holdoff to minimum or off
- Set the intensity control to a nominal viewing level
- Adjust the focus control for a sharp display
These are general instructions for setting up your oscilloscope. If you are not sure how to do any of these steps, refer to the manual that came with your oscilloscope. The Controls section describes the controls in more detail. |