Connection Tester
Description:
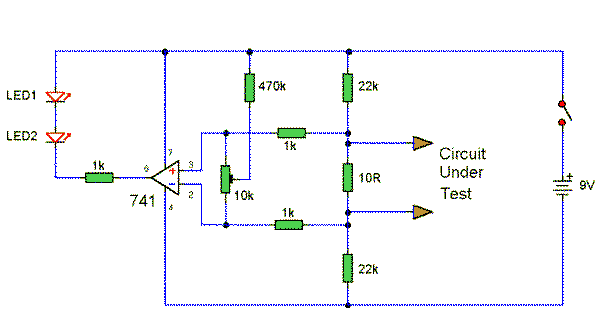
A low resistance ( 0.25 - 4 ohm) continuity tester for checking soldered joints and connections.
Notes:
This simple circuit uses a 741 op-amp in differential mode as a continuity tester. The voltage difference between the non-inverting and inverting inputs is amplified by the full open loop gain of the op-amp. Ignore the 470k and the 10k control for the moment, and look at the input of the op-amp. If the resistors were perfectly matched, then the voltage difference would be zero and output zero. However the use of the 470k and 10k control allows a small potential difference to be applied across the op-amp inputs and upset the balance of the circuit. This is amplified causing the op-amp output to swing to full supply voltage and light the LED's.
Setting Up and Testing:
The probes should first be connected to a resistor of value between 0.22 ohm and 4ohm. The control is adjusted until the LED's just light with the resistance across the probes. The resistor should then be removed and probes short circuited, the LED's should go out. As the low resistance value is extremely low, it is important that the probes, (whether crocodile clips or needles etc) be kept clean, otherwise dirt can increase contact resistance and cause the circuit to mis-operate. The circuit should also work with a MOSFET type op-amp such as CA3130, CA3140, and JFET types, e.g. LF351. If the lED's will not extinguish then a 10k preset should be wired across the offset null terminals, pins 1 and 5, the wiper of the control being connected to the negative battery terminal. A pin out for the 741 can also be found here