|
Introduction
Welcome to the start of the PIC Tutorial. These pages will take you form the basic structure of the device, right through to programming methods and techniques. Also, there will be suggestions on how to modify the code so that you can adapt the PIC to suit your applications within Cybot. We will not be including any internal architecture diagrams, as this may only lead to confusion. If you want to look at the datasheet, then this can be downloaded from Microchips' web site.
To start, let us take a look at the PIC.
Microchip PIC 16F84 Microcontroller
Microchip manufacture a series of microcontrollers called PIC. You can see the range of their microcontrollers here. There are many different flavours available, some basic low memory types, going right up through to ones that have Analogue - To- Digital converters and even PWM built in. We are going to concentrate on the 16F84 PIC. Once you have learnt how to program one type of PIC, learning the rest is easy.
There are several ways of programming the PIC - using BASIC, C, or Assembly Language. We are going to show you the Assembly Language. Don't be put off by this. There are only 35 instructions to learn, and it is the cheapest way to program the PICs, as you do not need any extra software other than the freebies.
The 16F84 Pins
Below is a diagram showing the pin-outs of the PIC 16F84. We will go through each pin, explaining what each is used for.
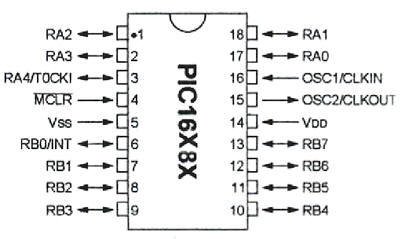
RA0 To RA4
RA is a bidirectional port. That is, it can be configured as an input or an output. The number following RA is the bit number (0 to 4). So, we have one 5-bit directional port where each bit can be configured as Input or Output.
RB0 To RB7
RB is a second bidirectional port. It behaves in exactly the same way as RA, except there are 8 - bits involved.
VSS And VDD
These are the power supply pins. VDD is the positive supply, and VSS is the negative supply, or 0V. The maximum supply voltage that you can use is 6V, and the minimum is 2V.
OSC1/CLK IN And OSC2/CLKOUT
These pins is where we connect an external clock, so that the microcontroller has some kind of timing.
MCLR
This pin is used to erase the memory locations inside the PIC (i.e. when we want to re-program it. In normal use it is connected to the positive supply rail.
INT
This is an input pin which can be monitored. If the pin goes high, we can cause the program to restart, stop or any other single function we desire. We won't be using this one much.
T0CK1
This is another clock input, which operates an internal timer. It operates in isolation to the main clock. Again, we won't be using this one much either.
How To Program The PIC
OK, so you haven't been put off so far. Now, you want to know how to program the PIC, but apart from learning the assembly code instructions, how do you go about actually programming the information in? Well, there are two ways - the easy way, and the DIY way. The easy way is to buy a PIC programmer (around £35), which will connect to your PC and you can program your PIC using the software provided. The DIY way is to build your own programmer (cheapest is just under £20) and use free software from the Internet and program it that way.
If you want to go for a DIY method, then We thoroughly recommend this site, and click on 'Supported Programmers' for circuits. The cheapest is TAIT Classic Programmer. Software for programming the PIC can also be downloaded from this site, under Download
If you want to go down an easier route, then check out this site. Here you can either buy a kit of parts or a ready made unit.
Another good site for some FREE software is here This software allows you to use any programmer, as the software is fully configurable.
Either method will do, as they both result in the same thing - program a PIC.
The next thing you will need is an assembler. This converts the program that you write into a format that the PIC understands. The best one around is from Microchip themselves, called MPLAB. It is windows based, and includes an editor, simulator, and assembler. This is the de-facto software, as it is written by the manufacturers of the PIC, and above all it is FREE!
We also recommend using Breadboard to make your circuits up, while you are playing with the PIC. There are various sizes available, which come with their own costs. Check out the Maplin Electronics links on the home page for more details of prices etc.
Next, we will look at how to connect up a simple circuit for PIC development.
Click here to Start Tutorial >>
(Connect to the PIC Microcontroller)
|