Vertical Controls
Use the vertical controls to position and scale the waveform vertically. Your oscilloscope also has controls for setting the input coupling and other signal conditioning, described in this section. Following Figure shows a typical front panel and on-screen menus for the vertical controls.
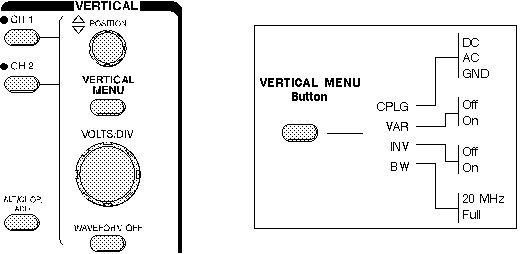
Vertical Controls
Position and Volts per Division
The vertical position control lets you move the waveform up or down to exactly where you want it on the screen.
The volts per division (usually written volts/div) setting varies the size of the waveform on the screen. A good general purpose oscilloscope can accurately display signal levels from about 4 millivolts to 40 volts.
The volts/div setting is a scale factor. For example, if the volts/div setting is 5 volts, then each of the eight vertical divisions represents 5 volts and the entire screen can show 40 volts from bottom to top (assuming a graticule with eight major divisions). If the setting is 0.5 volts/div, the screen can display 4 volts from bottom to top, and so on. The maximum voltage you can display on the screen is the volts/div setting times the number of vertical divisions. (Recall that the probe you use, 1X or 10X, also influences the scale factor. You must divide the volts/div scale by the attenuation factor of the probe if the oscilloscope does not do it for you.)
Often the volts/div scale has either a variable gain or a fine gain control for scaling a displayed signal to a certain number of divisions. Use this control to take rise time measurements.
Input Coupling
Coupling means the method used to connect an electrical signal from one circuit to another. In this case, the input coupling is the connection from your test circuit to the oscilloscope. The coupling can be set to DC, AC, or ground. DC coupling shows all of an input signal. AC coupling blocks the DC component of a signal so that you see the waveform centered at zero volts. Following Diagram illustrates this difference. The AC coupling setting is handy when the entire signal (alternating plus constant components) is too large for the volts/div setting.
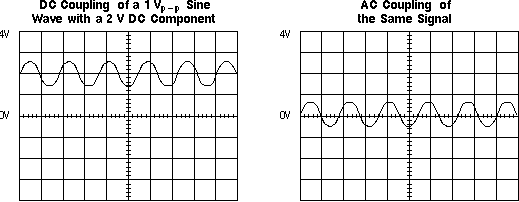
AC and DC Input Coupling
The ground setting disconnects the input signal from the vertical system, which lets you see where zero volts is on the screen. With grounded input coupling and auto trigger mode, you see a horizontal line on the screen that represents zero volts. Switching from DC to ground and back again is a handy way of measuring signal voltage levels with respect to ground.
Bandwidth Limit
Most oscilloscopes have a circuit that limits the bandwidth of the oscilloscope. By limiting the bandwidth, you reduce the noise that sometimes appears on the displayed waveform, providing you with a more defined signal display.
Channel Invert
Most oscilloscopes have an invert function that allows you to display a signal "upside-down." That is, with low voltage at the top of the screen and high voltage at the bottom.
Alternate and Chop Display
On analog scopes, multiple channels are displayed using either an alternate or chop mode. (Digital oscilloscopes do not normally use chop or alternate mode.)
Alternate mode draws each channel alternately - the oscilloscope completes one sweep on channel 1, then one sweep on channel 2, a second sweep on channel 1, and so on. Use this mode with medium- to high-speed signals, when the sec/div scale is set to 0.5 ms or faster.
Chop mode causes the oscilloscope to draw small parts of each signal by switching back and forth between them. The switching rate is too fast for you to notice, so the waveform looks whole. You typically use this mode with slow signals requiring sweep speeds of 1 ms per division or less. Following Figure shows the difference between the two modes. It is often useful to view the signal both ways, to make sure you have the best view.
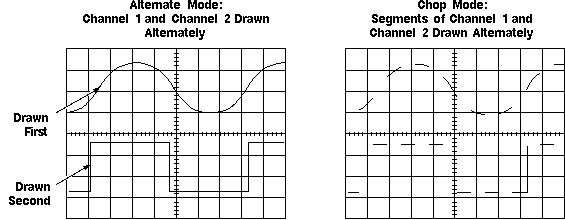
Multi-Channel Display Modes
Math Operations
Your oscilloscope may also have operations to allow you to add waveforms together, creating a new waveform display. Analog oscilloscopes combine the signals while digital oscilloscopes mathematically create new waveforms. Subtracting waveforms is another math operation. Subtraction with analog oscilloscopes is possible by using the channel invert function on one signal and then use the add operation. Digital oscilloscopes typically have a subtraction operation available. Following Figure illustrates a third waveform created by adding two different signals together.
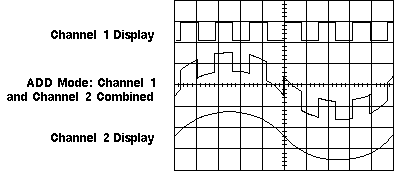
Adding Channels |